


IN THE CASE
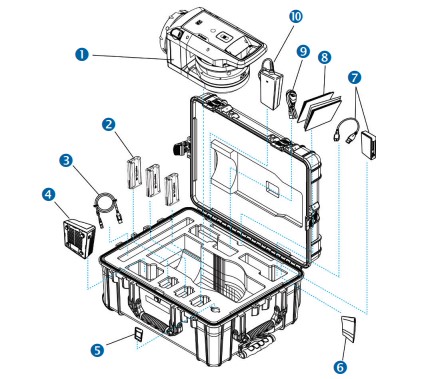
- X9 3D Laser Scanner
- Battery (x3)*
- USB Communication Cable
- Dual Battery Charger**
- SD Card
- Cleaning Cloths
- SD Card Reader
- Documents: Quick Start Guide, Warranty Activation Card, Instrument Test Certificate, Regulatory Inform
- Power Supply Cable for Charger**
- Power Supply for Charger**
* Shipping regulations only allow two batteries to be packed separately and one battery to be inserted in the instrument. You must remove the tape over the contact of the battery in the instrument before use.
** Regional parts (P/N 101070-00-##) ordered and shipped separately.
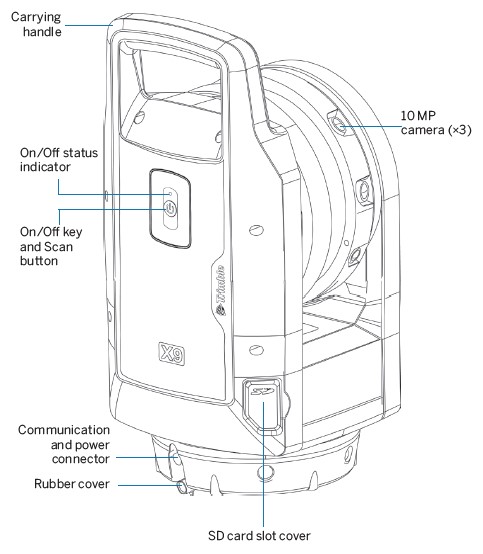
FEATURES
SPECIFICATIONS

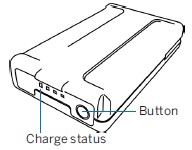
BATTERY INFORMATION
 WARNING – Before charging or using the battery, it is important that you read and understand the battery safety and environmental information in the X9 Regulatory Information Document.
NOTE – Remove the tape over the contact of the battery stored in the instrument before charging or using it with the scanner.
Use only batteries with P/N 99511-30. The performance of the battery is lower at temperatures below 0 °C (32 °F). A cold battery might not be enough to start the instrument. For best battery performance, keep the battery close to 20 °C (68 °F) before using it. The battery has status indicator LEDs. Push the button on the battery to check the charge status.
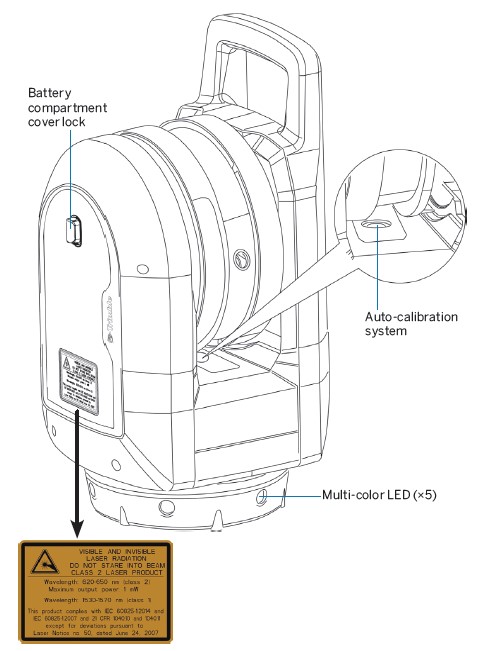
Change the Battery
When the rechargeable Lithium-ion battery is delivered, it is partially charged. Before using the battery for the first time, charge it completely using a Trimble dual battery charger (P/N 109000).
NOTE – Refer to the X9 User Guide for more information.
Insert the Eternal Battery
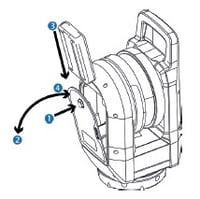
- Press the battery compartment lock downward to unlock.
- Open the battery compartment.
- Insert the battery into the battery compartment, with the battery connectors positioned towards the bottom of the instrument, and facing inward.
- Close the battery compartment.
Insert a Memory Card
NOTE – Before inserting (or removing) a memory card from the instrument, ensure that the instrument is off.
CAUTION – Do not insert the memory card upside down or back to front. Inserting it incorrectly could damage the instrument and/or the memory card.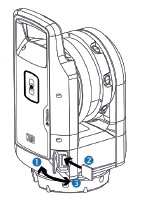
- Open the memory card slot cover.
- Slide the memory card into the card slot until it clicks into the locked position.
- Close the memory card slot cover.
SETUP
A stable setup is critical for high-precision measurements. Set the tripod legs wide apart to ensure stability. Please consider that the instrument requires sufficient time to adjust to the ambient temperature. The rule-of-thumb for a high-precision measurement is:
- Celsius: Temperature difference in degrees Celsius (°C) ×2 = duration in minutes required for the instrument to adjust to the new ambient temperature.
- Fahrenheit: Temperature difference in degrees Fahrenheit (°F) = duration in minutes required for the instrument to adjust to the new ambient.
POWER ON/OFF INSTRUMENT
- Power on the instrument with a short press of the On/Off key. You will hear ascending beeps when the instrument is starting up.
- To power off the instrument, press the On/Off key until the On/Off key LED starts to flash with a high frequency. The On/Off key LED will continue to flash with a high frequency until the instrument powers off. You will hear descending beeps when the instrument is shutting down.
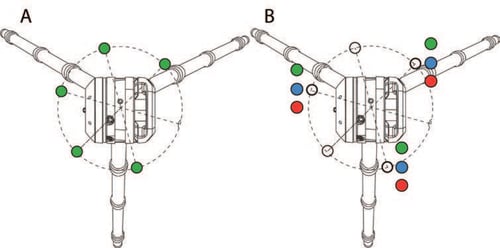
LEDs
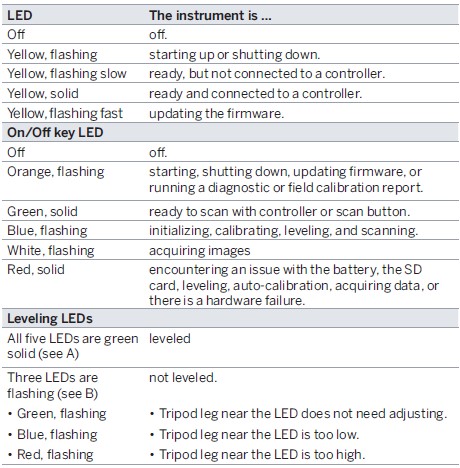
NOTE – All LEDs and LED leveling guides can be turned on/off. Refer to the field software documentation.
OPERATION
The instrument is operated from the Trimble T10x tablet or comparable Microsoft® Windows® 10 tablet running the Trimble Perspective, Trimble Field Link, or Trimble Forensics Capture software. When the instrument is started, it is available for connection by the field software with Wi-Fi or with a USB 2.0 cable.
NOTE – Use only the approved Hirose 6P-PC to USB 2.0 cable (P/N 53096032) for cable communication between the instrument and the controller.
NOTE – Scans can be started with a short press of the power button when the controller is not connected.

